Tuesday 23 July 2013

Panasonic Lumix DMC-LF1 Review


Over the years I’ve owned a number of digicams just like this one and each has been damned useful. Pop in the pocket. Pull it out. Shoot. And enjoy.
However, in the last 2-3 years they have become really fearsome beasts with tech specs that ring with power.
Not only can these more recent arrivals shoot big, big stills but some have enormous zoom ranges and all can shoot Full HD video.
So who needs a DSLR or a MILC?
This little number from Panasonic is a good example of shooting power but with a certain finesse.

This little number from Panasonic is a good example of shooting power but with a certain finesse.

Panasonic Lumix DMC-LF1 Features

The lens in particular screams quality: an f2 Leica DC Vario-Summicron 7.1x zoom that equates to a 35 SLR optic of 28-200mm range. The only downer is that you cannot enjoy the full f2 all the way through the zoom range; it soon shrinks to f5.9. But it does mean you can enjoy limited focus effects at the f2 aperture.

This shot was made at full wide on the zoom and at f2. Notice the limited depth of field.
However, it would be easy to miss the standout feature of this diminutive picture maker: beside the large 7.6cm LCD screen at the camera’s rear, there is also an electronic screen tucked away on the camera’s left top corner (as viewed from the rear). This will win many hearts!
The LF1 offers Wi-Fi connectivity so that users can connect the camera to their smart phone or tablet with one touch to share an image. You can also use a smart phone or tablet as a remote shutter with a monitor.
The CMOS captures a maximum image size of 4000×3000 pixels, enough to make a 34x25cm print.
Video can be shot in either AVCHD or MEG4 formats at Full HD 1920×1080 pixel quality. You can shoot stills mid video recording at a reduced size. If you shoot in AVCHD the maximum recording time is 29 minutes and 59 seconds.


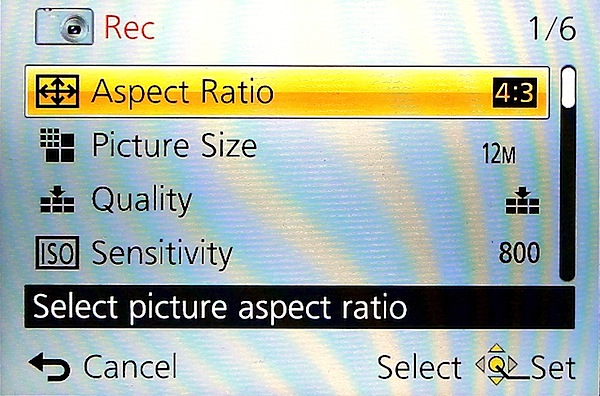
The control layout is very straightforward:
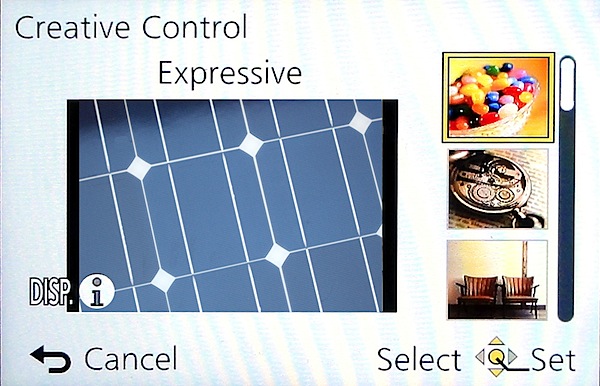
Top deck has the viewfinder mentioned earlier, with dioptric adjustment; then there’s the mode dial with positions for intelligent auto, PASM, two custom modes, panorama shooting, scene modes (16 in all) and creative control with 11 settings, including retro, old days, high and low key etc.

Panoramas can be shot laterally and vertically left to right, right to left, up or down and stitched in-camera. With the creative panorama function you can apply filter effects of retro, expressive, high or low key etc. The camera does not shoot horizontally panned panos with the camera held vertically, unlike some other cameras … notably Sony’s.
Next to the mode dial is the shutter button set within the lever for zooming; the power switch is at the extreme right end.
Rear: at the extreme left is the button to switch from rear screen to turret viewfinder; next is the WiFi button.
Beneath it is the video record button, shielded from accidental triggering by a protective slice of leatherette; adjacent is the Function and replay buttons.
Lower is the four way control dial with positions for macro shooting, exposure compensation, flash options and continuous/self timer. The menu button is central.
Lower still is a button for display options and one for trash.
Overall, a good layout but one that is badly let down by all the identifying text being too small, printed in off-white and almost impossible to read in dim light. Why not white text?

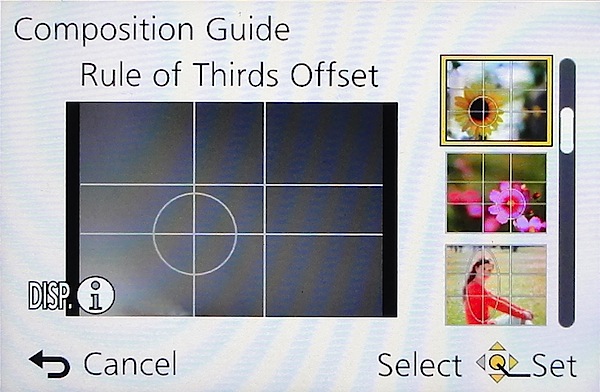
Tap the Function button and you gain access to a rather novel aid: a Composition Guide that makes it easy to shoot a photo with good composition, by choosing from a range of on screen examples: Rule of Thirds Offset, Diagonal Lines, Tunnel etc. A big help for those beset with poor visual acumen. It’s unlikely to prevent cut off heads or feet … but at least your shots will be visually balanced!

DistortionNo distortion evident at either the wide or tele ends of the zoom.

Start Up
In two seconds from startup you can shoot the first shot; follow-ons nearly as fast as you can hit the button.

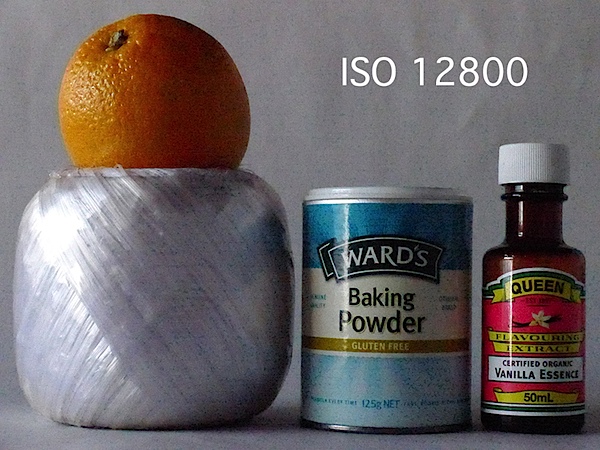
Panasonic Lumix DMC-LF1 ISO Tests


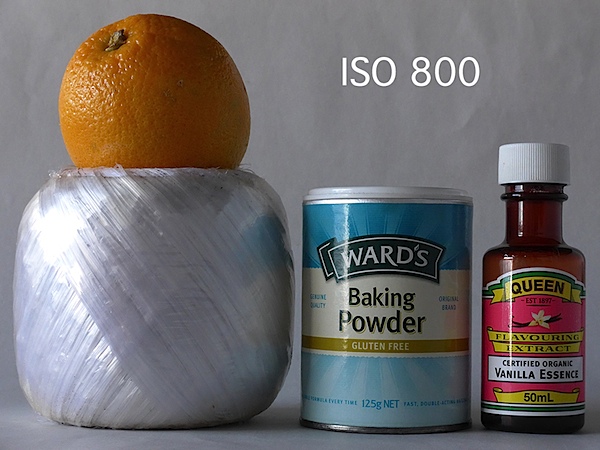
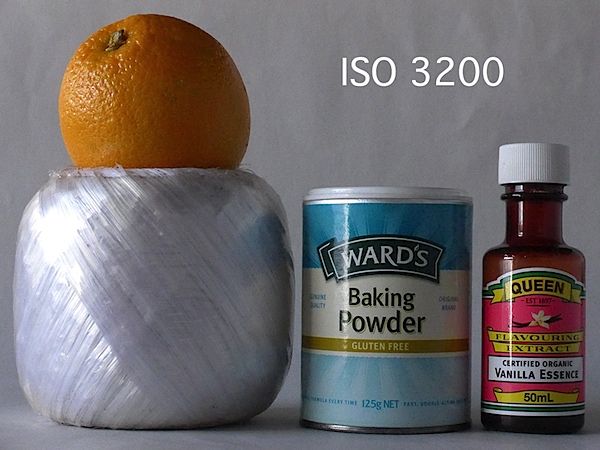
Only at ISO 3200 did noise become apparent. At ISO 6400 overall quality declined while noise increased and odd artefacts appeared. Useable? Maybe.
At ISO 12800 the shot was unusable.

Panasonic Lumix DMC-LF1 Review Verdict

Quality: average.
Why you’d buy it: small, sufficient zoom range for most purposes; shoot RAW files.
Why you wouldn’t: LCD screen is not vari-angle.
A great little number for easy, high quality photography. Available in silver or black.

Panasonic Lumix DMC-LF1 Specifications

Image Sensor: 12.1 million effective pixels.
Metering: Multi zone, centre-weighted, spot.
Lens: Leica DC Vario-Summicron f2.0-5.9/6.0-42.8mm (28-200mm as 35 SLR equivalent).
Exposure Modes: Auto, Program AE, shutter and aperture priority, manual.
Sensor Size: 15mm CMOS.
Shutter Speed (stills): 60 to 1/4000 second.
Continuous Shooting: 10 fps.
Memory: SD/SDHC/SDXC plus 87MB internal memory.
Image Sizes (pixels): Stills: 4000×3000 to 640×360.
Movies: 1920×1080, 1280×720, 1440×1080 and 640×480.
Viewfinder: 7.6cm LCD screen (920,000 pixels).
File Formats: JPEG, RAW, JPEG+RAW, MPO (3D), AVCHD, MPEG4.
Colour Space: sRGB, Adobe RGB.
ISO Sensitivity: Auto, 80 to 12800 (with boost).
Interface: USB 2.0, HDMI mini, WiFi.
Power: Rechargeable lithium ion battery, DC input.
Dimensions: 103x62x28 WHDmm.
Weight: 192 g (inc battery).
Price: Get a price on the Panasonic Lumix DMC-LF1 12 MP Digital Camera (White) or Panasonic Lumix DMC-LF (Black).

Monday 22 July 2013

11 Tips for Beginner Photographers

1. Don’t go crazy buying the most expensive equipment right away.

It’s possible to get very nice photos with an inexpensive point and shoot. See these examples on Flickr. The more photos you take, the more you’ll know about what kind of camera to get when it’s time to upgrade.

2. Consider a tripod.
On the other hand, an inexpensive tripod is worth getting, especially if you have shaky hands like mine. When I got a tripod, my satisfaction with my shots skyrocketed. For even more stability, use your camera’s timer function with a tripod (read our introduction to tripods).

3. Keep your camera with you all the time.
Photo ops often come when you least expect it. If you can keep your equipment relatively simple – just a small camera bag and a tripod – you might be able to take advantage of some of those unexpected opportunities. Or, if your phone has a camera, use it to take “notes” on scenes you’d like to return to with your regular camera.

4. Make a list of shots you’d like to get.
For those times you can’t carry your camera around, keep a small notebook to jot down places you’d like to come back and photograph. Make sure to note any important details, like the lighting, so you can come back at the same time of day or when the weather’s right. If you don’t want to carry a notebook, send yourself an email using your cell phone with Jott.com.

5. Don’t overlook mundane subjects for photography.
You might not see anything interesting to photograph in your living room or your backyard, but try looking at familiar surroundings with fresh eyes. You might catch an interesting trick of the light or find some unexpected wildflowers in your yard. Often a simple subject makes the best shot.

6. Enjoy the learning process.
The best part of having a hobby like photography is never running out of things to learn. Inspiration is all around you. Look at everything with the eyes of a photographer and you’ll see opportunities you never noticed before.

7. Take advantage of free resources to learn.
Browse through Flickr or websites like the Digital Photography School Forum for inspiration and tips. Also, your local library probably has a wealth of books on all types of photography. If you’re interested in learning about post-processing, give free software like the GIMP a try.

8. Experiment with your camera’s settings.
Your point and shoot may be more flexible and powerful than you know. Read the manual for help deciphering all those little symbols. As you explore, try shooting your subjects with multiple settings to learn what effects you like. When you’re looking at your photos on a computer, you can check the EXIF data (usually in the file’s properties) to recall the settings you used.

9. Learn the basic rules.
The amount of information about photography online can be overwhelming. Start with a few articles on composition. Be open to what more experienced photographers have to say about technique. You have to know the rules before you can break them.

10. Take photos regularly.
Try to photograph something every day. If you can’t do that, make sure you take time to practice regularly, so you don’t forget what you’ve learned. An excellent way to motivate yourself is by doing the weekly assignments in the DPS Forum.

11. Don’t be afraid to experiment.
If you’re using a digital camera, the cost of errors is free. Go crazy – you might end up with something you like. You’ll certainly learn a lot in the process.

Tuesday 16 July 2013

How To: Earn Extra Cash With Your Camera

There are plenty of opportunities for bringing in a few extra bucks while doing what you love—and you won’t have to quit your day job. Here’s how.

Chris Garrison, who started out shooting part-time and later turned pro, makes money photographing the extreme events he loves.

You’ve invested in camera gear and you love taking pictures, but you’re not interested in a full-time photography career, especially when pros these days don’t exactly have it easy. Still, you can earn a little extra with your camera—if you’re willing to put in the time and effort—and keep your weekly paycheck, too. Whether you want to shoot weddings or portraits, sell prints or stock, or capture local sporting events, here’s the skinny on getting started.

Try Weddings
Wedding photography is almost recession-proof and, since weddings are seasonal and often on weekends, it’s relatively easy to shoot part-time. Freelance wedding photographer and writer Nathan Chandlersplits his time between shooting and writing, and explains that his start in wedding photography began when family and friends saw his landscapes and casual portraits and assumed he could photograph nuptials, too. After about five years, Chandler was enjoying wedding photography enough that he begain actively trying to get wedding jobs. The Nebraska-based photographer now shoots about 20 each season.

Seattle-based Chloe Ramirez started out as a second shooter for other wedding photographers. “That gave me the background and confidence to start photographing weddings on my own,” says Ramirez, adding that she didn’t go out on her own until after a solid year of second shooting.

She also suggests styling your own wedding shoot for portfolio images by working with local vendors—make-up artists, venues, etc.—and exchanging pictures for their services. From there, send the final images to a wedding blog, says Ramirez. “If it gets picked up, that gives you and the vendors exposure for your businesses.” And, she adds, “Ask vendors if you can refer your brides and grooms; they will most likely return the favor and that will get you more inquiries.”

During the three-to-four month wedding season, Ramirez shoots full-time, accepting up to four weddings per month, and puts her three-year-old daughter in daycare two days a week so she can concentrate on editing. “That way, when I am home with my family, I am present and not trying to juggle both [family and work].”

Take Portraits
Child and family photography is a growing market and a realistic—and often fun—option for photographers who want to earn a little money on the side.


Amy Grace, a parent of two and an active member of the family photo website Little Bellows, got her first DSLR two years ago. She began by shooting personal images, spending a lot of time photographing her children as well as friends and family. About a year ago, she got her first paid job and found that the “wisdom, patience, and attentiveness” learned from photographing her own children was “invaluable” for working with other families. Grace currently takes limited sessions—preferring no more than one client a month—so she can care for her children, but expects this to change in the future.

She posts weekly on Little Bellows and writes a column called “Motherhood With a Camera.” She says, “The weekly posts have increased my audience; the feedback and connections from readers are inspiring and encouraging, and it confirms that there is so much depth, talent, and purpose behind the often-dreaded moniker MWAC [Mother With a Camera].”

In addition to the inquiries from Little Bellows readers, Grace finds that her clients come to her via word of mouth—whether locally or via social media like Facebook.

Photographing since high school, Lora Swinson only started shooting portraits when her oldest son was born. Soon after, she asked everyone she knew if she could photograph them to get experience. “My biggest tip for anyone starting out is to ask your family members and friends for their help. Word-of-mouth is your biggest tool in this industry.” But, she cautions, “be honest and open about your skill level and what they should expect.”

Sell Prints 
Selling your images—whether via galleries, online, or at art fairs—can be a challenge, but it isn’t impossible. Landscape and fine-art photographer Derek Jecxz combined research, persistence, and a portfolio of extraordinary images to sell his work. He entered competitions from “reputable” museums and galleries, which helped him get into other galleries. After a couple of years, licensing company Bruce McGaw Graphics approached him with a contract to reproduce and distribute his work.


New York City-based Deborah Gilbert makes hand-colored silver gelatin prints, and she has traveled far and wide to sell her work at art fairs. While she’d once do as many as 43 shows in a single year, she now concentrates on those in the Northeast. She suggests that newcomers start small with local shows where tables rent for for $20-$25. Larger shows may cost up to $2,000.

Gilbert points out that you won’t necessarily make more money at a higher-level show, especially after deducting fees. “You can make more at the smaller local shows at the Kiwanis club,” she says. She mixes both local and higher-end shows and recommends that if you’re traveling, pick locations where you have family or friends that you can stay with to cut down on hotel expenses.

Gilbert offers framed, original hand-colored photos for around $500, but also sells smaller, matted reproductions that cost less. Her matted works are standard sizes, so buyers won’t need a custom frame.

Both Jecxz and Gilbert caution photographers to do their research before handing over money to any online site since there are some organizations that really don’t deliver useful— if any—services. And to find lists of national art shows, Gilbert suggests subscribing to Sunshine Artistmagazine.

Shoot Sports 
Photographing your team from the bleachers isn’t much fun, so why not combine your passions for sports and photography? Pennyslvania-based Den Sweeney and partner Ho Chuen Kan (a.k.a. J-Kan) get hired by universities, high-school programs, and parent groups to shoot games as well as athletic portraits. In addition to showcasing your work using social media, Sweeney suggests that photographers shoot for fun to improve. But, adds the former hockey player, coach, and recruiter, “know the sport that you’re photographing.”


And don’t forget about the video setting on your DSLR. Lion Creative Group, headed up by Matthew Leone, recently added high school sports recruitment videos to its services. As Leone explains, there are many top-notch athletes vying for the attention of scouts and college coaches, but “college program budgets are getting slashed, so the best way to get noticed is a top-quality video.”

For those new to the field, Leone suggests approaching the “athletic directors and high school coaches of top programs; those are the ones that sniff out talent. The athletes trust their coaches and ADs. Get a coach and an AD to trust your service and they will help you multiple times.”

If extreme sports are your thing, check out Chris Garrison’s work. Garrison, who shoots wakeboarding and snowboarding, knows both sports well and, equally important, knows the athletes. He started by shooting for magazines part-time, submitting images to various publications, and last year he was able to make the switch to shooting full-time. “I think of editorial as paid advertising for my work, because that’s how the manufacturers [of extreme sports gear] find you.”

Sell Stock 
While pros now depend less on stock, there are still plenty of opportunities for amateurs with companies such as Shutterstock, iStock Photo, and Getty’s Flickr collection.

Scott Braut, VP of Content at Shutterstock, notes that the “images that sell best often express both concepts and literal subject matter. An image of a rock climber can be used to illustrate an article about extreme sports but also signifies business concepts.”

He suggests that contributing photographers pay attention to “advertisements, the news, lifestyle trends, fashion trends, political and social issues.” And, he says, upload images often. “The secret to a top-selling portfolio is to keep putting new work in front of customers.”

Jennifer Huls joined Shutterstock in 2012, less than two years after she first started learning to use her camera. A mother of three, Huls says that being a parent “takes up most of my time, but it is nice to have a part-time job that I can do from home.”

She submits 20 to 25 images a week to Shutterstock, about 90 percent of which are shot in her basement studio. So far, Huls reports, “I have met all of my earnings goals and hope that this year is as good as the last.” Her advice? “Shoot what you are passionate about and don’t worry about what will sell. Some will sell and some won’t, but at least you won’t get bored with it.”

Monday 15 July 2013

Camera Test: Nikon D7100

With higher ISOs, faster burst rates, and better resolution, this upgrade has something for everyone


If you’re serious about your photography, but just as serious about value, Nikon’s D7100 ($1,197, body only) has likely caught your eye. Its 24MP APS-C-sized CMOS sensor promises lots of resolution; dual card slots help you organize while shooting and afford plenty of storage; and the pop-up flash can wirelessly trigger off-camera units. Plus, the 6-frame-per-second burst is fast enough for sports, while the 51-point autofocus system can track subjects while you capture the action.

While the D7100 isn’t as much of a tank as the D300s, it’s no wimp. Its magnesium-alloy body should prove tough enough for most shooting conditions, and it has almost as much weather-sealing to ward off dust and moisture as Nikon’s pro bodies. Best of all is how well it fared out in the field and in the Popular Photography Test Lab.

In the Test Lab
Ample resolving power, adequate noise control, and accurate color reproduction earned the D7100 an Excellent rating in our tests from its lowest sensitivity setting of ISO 100 through ISO 1600. That’s one stop beyond the range of Canon’s 18MP EOS 60D ($899, body only) when we tested it in our February 2011 issue, but obviously that competitor is now ripe for replacement.

Barely outresolving Nikon’s D5200, the D7100 turned in 2820 lines per picture height at ISO 100, well past the 2500 line cutoff for an Excellent rating. In fact, not until ISO 6400 did the D7100 dip below that goal, at 2470 lines. At the top sensitivity of ISO 25,600 (Nikon calls it Hi2), resolution hit 2230 lines. At its best, the Canon 60D delivered 2600 lines and held most of it—2500 lines—at ISO 6400.

In our color accuracy test, the D7100 easily won top honors with an average Delta E of 7.0. The 60D, which scored 6.8, nearly tied it.

Noise? Superbly controlled at lower ISOs, with Extremely Low ratings at ISO 100, 200, and 400. It doesn’t rise to a Low rating until ISO 1600 and doesn’t reach Unacceptable until ISO 12,800. Not surprising, since Nikon’s DSLRs often cross our limit of acceptable noise precisely at the point the company labels sensitivity “Hi” instead of a numerical ISO.

Autofocus proved speedy, but not the fastest we’ve seen. It was a tad slower than the 60D at every light level in our lab test. (In our field testing, AF speed was never a problem.) But it offers a slight improvement over its predecessor, the D7000, focusing faster at EV 4, 2, 1, and 0. Plus, it managed to reliably achieve focus at EV –2, albeit with more variation in speed than we’d like to see; the D7000 couldn’t reliably focus in such dim light.

Overall, the D7100 performed as expected. It offers a two-stop improvement over the D7000 in usable sensitivity, and more than 400 lines more resolving power.

In the Field
As usual for Nikon, the D7100 has a nicely sculpted grip that feels very comfortable in the hand. Ample dedicated function buttons mean no digging through menus to change the most important shooting settings—in many cases, you won’t need to take your eye away from the viewfinder.

You’ll need both hands to operate the D7100 efficiently in some instances. For example, the AF/MF switch, on the front left of the body, has an embedded button that lets you switch other parameters, such as the AF mode and the number of active focus points, using the two command wheels on the right side of the body. Once you’re used to using both hands, it’s a fast way to prep for your next shot.

Similarly, pressing the ISO button on the left of the 3.2-inch 1,228,800-dot LCD lets you use the command wheels to change the ISO setting or choose between auto and manual ISO. This can be awkward: Your thumb goes between your face and the camera. Sure, space is tight on a DSLR, but the ISO button might be better placed elsewhere—Canon puts it near the shutter button on many of its DSLRs.

Sunday 14 July 2013

Long Exposure Photography Tips

1. Photographing the Ferris Wheel


To photograph a Ferris wheel at night, move close and use a wide-angle lens to get as much detail as possible. Place your camera on a tripod and frame the image. Because we want all the elements to be sharp, choose a small aperture between f/11-f/32. Set your camera to either Manual or TV (Shutter Priority) mode and choose a shutter speed according to the speed of the lighted Ferris wheel, and the style you are after (anywhere between 1-30 seconds). You should take the image using the camera’s self timer or a cable release so that you avoid touching and jiggling the camera. The image captured will be full of light trails against a black sky, yet the center beams that hold the wheel will be sharp.

2. Making Star Trails

A long exposure on a starry night can produce beautiful light trails created by the stars and the rotation of the earth. The best way to frame the image is to include an element of interest such as an old tree in the foreground. Place your camera on a tripod and focus the lens to infinity. You’ll want to use a cable release to eliminate camera shake of any kind, as it will RUIN your photo. Set the camera to B "Bulb" shooting mode and set your aperture to f/4 for optimal results. Depress the remote to open the shutter. You should keep your ISO at 100 to keep the digital noise at a minimum. To complete the photo after your desired elapsed time, depress the remote again, and release the shutter. These exposures can be 15 minutes to several hours long.

3. Stunning Light Trails

Traffic head light and tail light trails give a stunning effect and are a great way to get acquainted with long exposure times. Select a busy road that has lots of traffic at night. Use a sturdy tripod and position the camera so that it has an overview of the area. Use a small aperture of f/16 or smaller for a greater depth of field, making most of the image in focus. The longer the exposure, the more lines will appear and the longer they will look.

4. Blurry Sea Waters

To capture that dramatic look of the ocean and the sky, you should utilize the amazing light of “the golden hour”, the last hour before the sun sets. Follow the basics of night photography - place the camera on a tripod, use a wide-angle lens with the smallest aperture possible, and focus to infinity. Turn the camera’s mode dial to Manual or Bulb shooting mode and use a slow shutter speed (5-30 seconds) for a longer exposure. The longer the exposure the more misty the water appears. Use your camera’s self-timer or a cable release to take the photo with absolutely no blurring. Don’t use flash because it could ruin the effect in the image.

5. Determining Exposure

The exposure of your night time image will vary depending on certain factors. If there is a lot of ambient light then the shutter speed will be shorter. If you are shooting somewhere very dark, then the shutter speed will need to be longer. To capture the effects of light trails you need a shutter speed of at least 1/15th of a second, which means you must use a tripod. The image of the Houses of Parliament required a 6 second shutter speed, which is slow enough to capture the traffic trails. The f/8 aperture allowed the building to be sharp. The more you practice the more you will become tuned to the exposure you need for the effect you want.

Recommended Settings

The main thing to keep in mind while deciding on the correct exposure is how to capture both the shadows as well as the highlights. If you are successful in obtaining the right shadows, you will be able to produce an excellent night scene that will win you compliments. When taking long exposures, the key is to keep the shutter open only long enough for the desired effect. If you keep the shutter open too long, you’ll lose the details in whatever light source is illuminating your subject, and you might even lose the ability to identify what the subject is. When trying to create a light trail, the shutter should be open for at least 1 second, and therefore requires a tripod. Use shutter priority mode and start with 1 second shutter speed and see what the result is; if the trail is too short, add 2 seconds, and then keep adding 2 seconds until you get the lighting effect that you want (the beauty of digital photography is that you’ll know immediately). If you have too much blurring, then your shutter was open too long, and you need to dial it back down maybe a full second.

Recommended Equipment

In addition to your digital camera, you need a sturdy tripod to take good night photographs. This will ensure you stabilize your camera firmly, thereby avoiding blurriness in your pictures. In order to practice night photography, your camera must have the option for manually setting the shutter speed and aperture.

Conclusion

Taking long exposure images at night can be perfected with practice and by learning to recognize the lighting conditions and how to adjust the camera to meet those conditions. Depending of what you have to work with, your shutter speed can be anything from 1/60th of a second to several minutes. What makes long exposure images special is that each image is unique, since light trails move in unusual ways, and with practice you should have a collection of photos that are one of a kind. The unique images available using long exposures night is a whole realm of photography that many people do not attempt. Stunning images can be your reward for trying this technique.

Saturday 13 July 2013

Understanding Exposure - ISO, Aperture and Shutter Speed Explained

What controls exposure?

ISO ratings determine the image sensor’s sensitivity to light, each value of the rating represents a “stop” of light, and each incremental ISO number (up or down) represents a doubling or halving of the sensor’s sensitivity to light.

The Aperture controls the lens’ diaphragm, which controls the amount of light traveling through the lens to the film plane. The aperture setting is indicated by the f-number, whereas each f-number represents a “stop” of light.

The Shutter Speed indicates the speed in which the curtain opens then closes, and each shutter speed value also represents a “stop” of light. The shutter speed is measured in fractions of a second.


When these three elements are combined, they represent a given exposure value (EV) for a given setting. Any change in any one of the three elements will have a measurable and specific impact on how the remaining two elements react to expose the film frame or image sensor and how the image ultimately looks. For example, if you increase the f-stop, you decrease the size of the lens’ diaphragm thus reducing the amount of light hitting the image sensor, but also increasing theDOF (depth of field) in the final image. Reducing the shutter speed affects howmotion is captured, in that this can cause the background or subject to become blurry. However, reducing shutter speed (keeping the shutter open longer) also increases the amount of light hitting the image sensor, so everything is brighter. Increasing the ISO, allows for shooting in lower light situations, but you increase the amount of digital noise inherent in the photo. It is impossible to make an independent change in one of the elements and not obtain an opposite effect in how the other elements affect the image, and ultimately change the EV.

ISO Speed


ISO is actually an acronym, which stands for International Standards Organization. The ISO rating, which ranges in value from 25 to 3200 (or beyond), indicates the specific light sensitivity. The lower the ISO rating, the less sensitive the image sensor is and therefore the smoother the image, because there is less digital noise in the image. The higher the ISO rating (more sensitive) the stronger the image sensor has to work to establish an effective image, which thereby produces more digital noise (those multi-colored speckles in the shadows and in the midtones). So what is digital noise? It is any light signal that does not originate from the subject, and therefore creates random color in an image. The digital camera engineers have designed the image sensor to perform best at the lowest ISO (just like with film). On most digital cameras this is ISO 100, although some high end DSLRs have a mode that brings the ISO down to 50 or even 25.

Aperture


A lens’s aperture is the opening in the diaphragm that determines the amount of focused light passing through the lens. At a small f-stop, say f/2, a tremendous amount of light passes through, even at a fraction of a second; but at f/22, when the diaphragm is perhaps at its smallest, only a tiny amount of light is let in (even at longer shutter speeds). An interesting thing about the aperture and the f-numbers is that it doesn’t matter the focal length of the lens as long as the f-number is held constant. This is because the arithmetical equation that determines the f-number indicates that the same amount of light passes through the lens on a 35mm lens as on a 100mm lens, with a shutter speed of 1/125s. The size of the diaphragm is unquestionably different, but the amount of light passing through is the same.

Shutter Speed


Shutter speed is measured in fractions of a second, and indicates how fast the curtains at the film plane open and close. The shutter speed controls how long light enters the lens and hits the image sensor or film plane. The shutter speed enables you to capture the world in split seconds, but it can also absorb the world at speeds upwards of three and four seconds (or remain continually open up until the photographer wants to close the curtain). Snapping the shutter in a fraction of a second, also gives you control on how motion is recorded. If the shutter speed is faster than the object or background, then the image will be tack sharp. If the shutter speed is slower, then you’ll get blurred objects. Think about the rain in a rainstorm, how fast is that water falling? Well, at 1/30th the raindrops are streaks of undistinguishable white. But at 1/250th, the raindrops hover in mid air and you can see the full swell of each water drop.

What is "Auto Bracketing"?


Auto Bracketing is an exposure technique whereby you can ensure that you have the optimal exposure by taking at least three (3) exposures of the exact same composition with one at the metered EV, one at 1/3 of a stop below the metered EV and one at 1/3 of a stop above the metered EV. So “Auto Bracketing” is a function in which you set the EV value then release the shutter and the camera automatically makes the necessary up and down adjustments to the EV to give you the bracketed exposures. Then you can review the three (or more) exposures, see the subtle but critical differences in the images, and decide which one is the best image for your purposes. In the three images on the right, you might prefer the overexposed (by 2 stops) image because the setting sun is most brilliant. Bracketing was a technique that was popularized from shooting slide film, due to the limited ability to correct the image in the darkroom. Many photographers still use the technique today, so they have the exposure that they want. Having the three bracketed images lowers the amount of post-processing time that they might have to spend.

Overexposure & Underexposure


How do you define overexposure and underexposure, since we said that “correct” exposure is subjective? Simply put, overexposure is when the information in the highlights is effectively unreadable. When there is this type of excessive loss of image information there is no way to “retrieve” that missing information in the digital dark room. Underexposure is pretty much the same concept; except in this case there is no image information contained within the shadows. This non-existant information cannot be retrieved through post processing either. In digital photography, once that image information is gone, there’s no way to retrieve it. This is not always the case in the photochemical world of film photography. With film (as opposed to digital) processing, it is possible to “find” image information in an excessively underexposed frame, and perhaps “find” image information during the printing process for seriously overexposed images as well.

AE LOCK (AEL)

Auto Exposure Lock is a camera setting in which the EV is locked in (when you’re shooting one of the semi-automatic or fully automatic modes, i.e. Shutter-priority), so that now matter what changes there are to the lighting in the scene, the camera locks in the ISO, Shutter and/or Aperture settings, so you can continually achieve the same EV without having to re-meter the scene.

Conclusion

One highly practical advantage to digital photography is that it costs next to nothing to experiment with the camera’s controls, so go out there and shoot away. You want to become increasingly proficient with all three elements of the exposure triangle, so that you can make adjustments on the fly and know exactly what the resulting effect is going to be.